Step by Step Guide to Transplanting Seedlings Without Shock
You’ve nurtured your seedlings from tiny seeds, watched them sprout their first leaves, and now they’re ready for the next chapter of their journey. But here’s the thing that keeps many gardeners up at night: will your seedlings survive the move? Will they wilt, yellow, or worse, give up entirely after transplanting?
I’ve been there. Standing in my garden, watching seedlings I’d carefully raised from seed struggle after transplanting. The frustration is real. But here’s what I’ve learned through years of trial and error: transplanting seedlings without shock isn’t magic or luck. It’s about understanding what your plants need and following proven techniques that work.
Let me walk you through everything you need to know to transplant seedlings successfully, from recognizing when they’re ready to ensuring they thrive in their new home.
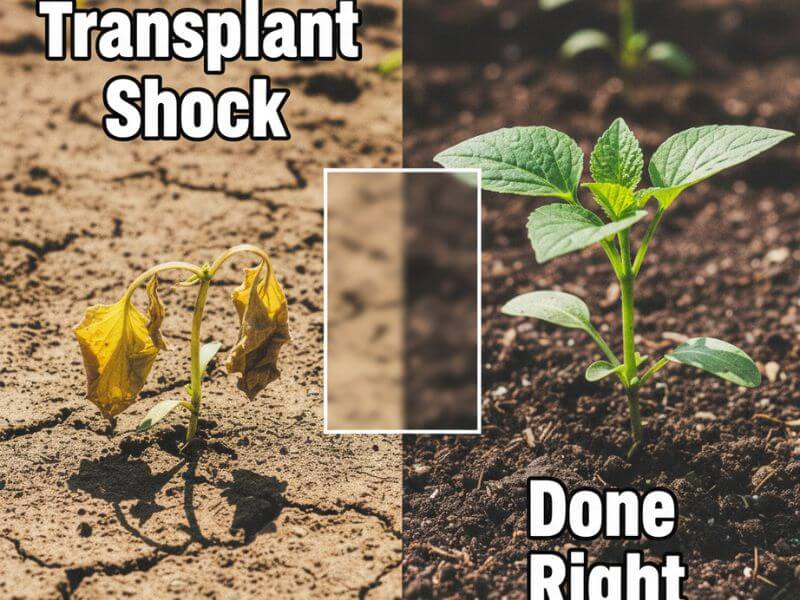
What is Transplant Shock and Why Does It Happen?
Transplant shock is your seedling’s stress response when moving from one location to another. Think about it like this: imagine being suddenly moved from a comfortable, temperature-controlled room into an unpredictable outdoor environment with harsh sun, wind, and fluctuating temperatures. That’s essentially what your seedlings experience.
The symptoms are easy to spot. Your plants might wilt, develop yellowing leaves, show stunted growth, or drop leaves prematurely. In severe cases, they might not recover at all.
Research shows that seedling mortality rates can range between 40% and 70% in the first year after transplanting when proper techniques aren’t followed. But here’s the encouraging part: studies on automated transplanting systems have achieved success rates of over 94% when optimal conditions are maintained. This tells us that with the right approach, you can dramatically improve your transplanting success.
Transplant shock happens primarily because of three factors: root disturbance, environmental changes, and nutritional stress. When you move a seedling, you’re disrupting its root system, which is literally its lifeline for water and nutrients. You’re also exposing it to new conditions like different light levels, temperature fluctuations, and wind. Finally, the plant might face nutritional challenges as it adjusts to new soil conditions.
When Should You Transplant Seedlings?
Timing is everything in gardening, and transplanting is no exception. Get this wrong, and you’re setting your seedlings up for unnecessary stress.
Look for True Leaves, Not Cotyledons
The most reliable sign that your seedlings are ready to transplant is the appearance of true leaves. When seeds first germinate, they produce cotyledons, which are thick, simple seed leaves that don’t look like the mature plant’s foliage. True leaves come next and resemble the leaves of an adult plant.
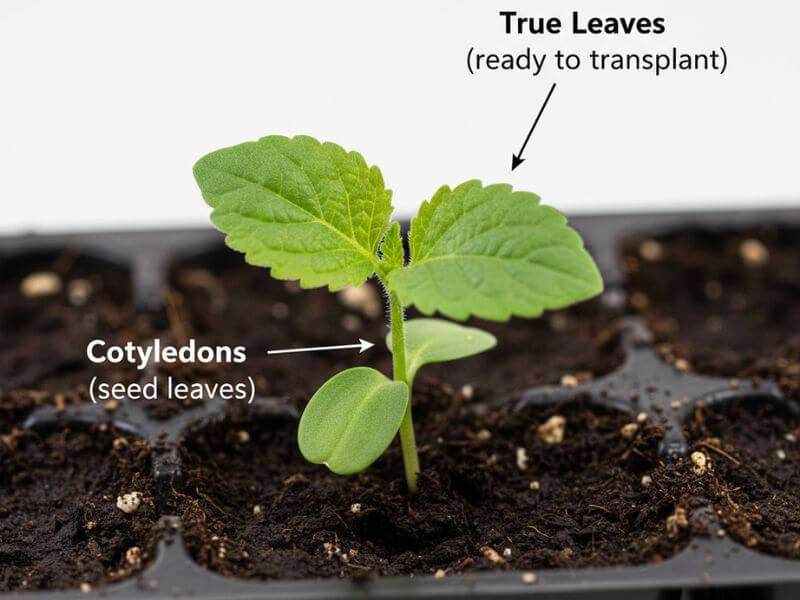
Wait until your seedlings have developed at least one to two sets of true leaves before considering transplanting. At this stage, they’re strong enough to handle the move but not so established that they become root-bound.
Check the Root System
The roots tell an important story. Gently check if roots are starting to poke out from drainage holes or if you can see them circling the container. A well-developed root system should hold the soil together when you lift the seedling, but it shouldn’t be so dense that roots are tightly packed.
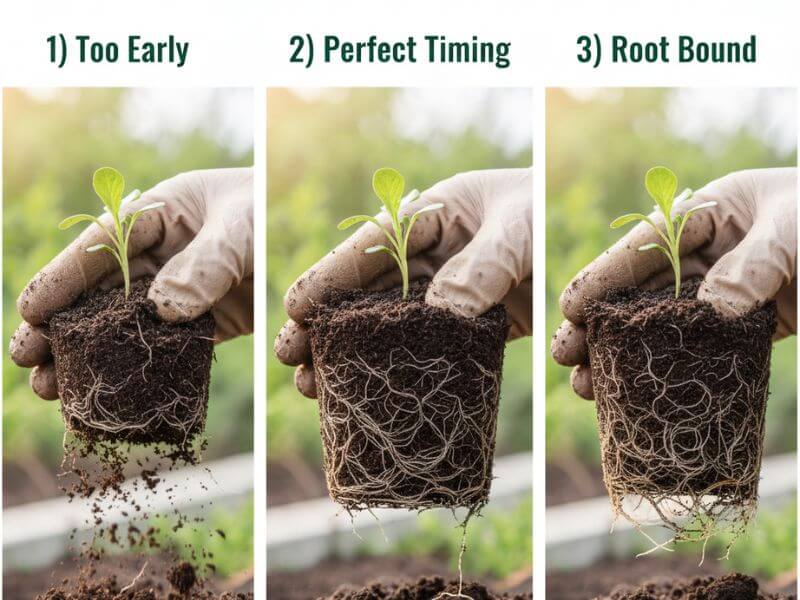
Here’s a simple test: try lifting a seedling by its true leaves. If it comes out cleanly with the soil intact, without needing to pry it out, the root system is developed enough. If roots break away or the soil crumbles, give it more time.
Consider Seedling Height and Vigor
While size isn’t everything, seedlings should typically be 2-3 inches tall before transplanting. More importantly, look for overall vigor. Strong, healthy seedlings with good leaf color and upright stems will handle transplanting much better than weak, spindly ones.
Time It With the Weather
For outdoor transplanting, weather matters tremendously. Move cool-weather crops like lettuce, broccoli, and kale when temperatures are mild and the threat of heavy frost has passed. Wait until soil temperatures reach at least 60°F before transplanting warm-season crops like tomatoes, peppers, and cucumbers.
According to research from commercial growers, seedlings in 1.5-inch cell trays can typically stay there for 2-3 weeks after germination, while those in 2-inch trays can remain for 3-4 weeks before needing to move.
How to Harden Off Seedlings (The Non-Negotiable Step)
If you skip hardening off, you’re essentially throwing your indoor-raised seedlings into boot camp without any preparation. This is probably the biggest mistake new gardeners make, and it causes more transplant failures than any other factor.
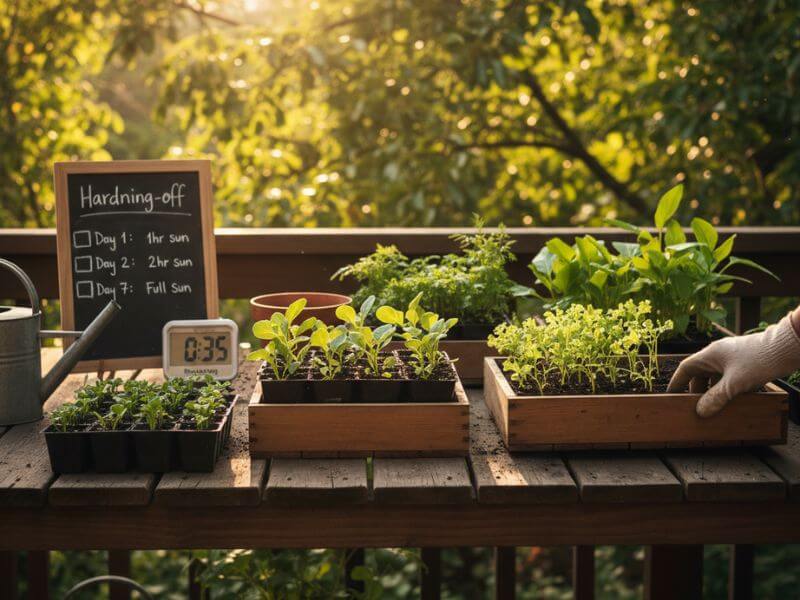
Hardening off is the gradual process of introducing indoor seedlings to outdoor conditions. It toughens them up by helping them develop firmer plant tissue, thicker cuticles on leaves, and stronger stems that can withstand wind and temperature swings.
The 7-14 Day Hardening Off Process
Start this process one to two weeks before you plan to transplant outdoors. Here’s how to do it right:
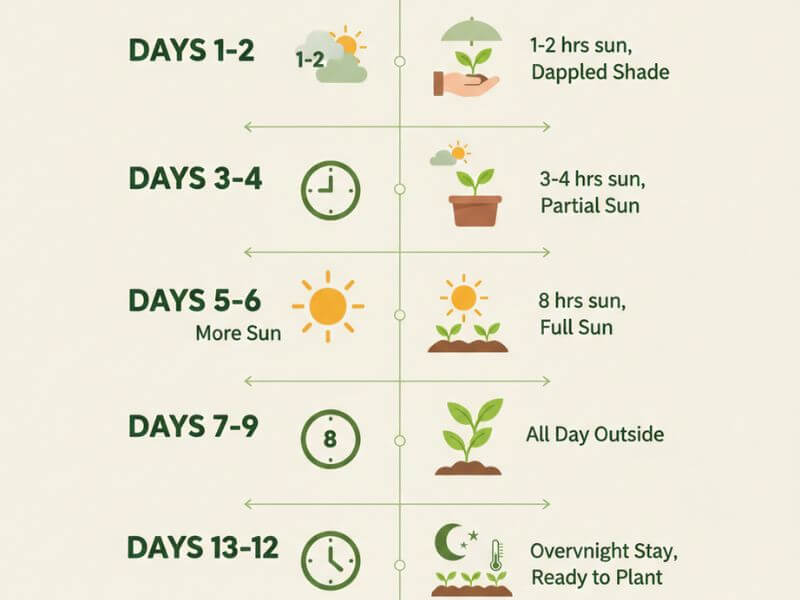
Days 1-2: Place seedlings in a sheltered outdoor spot with dappled shade for 1-2 hours. Choose a location protected from wind and direct sun. Bring them inside each night.
Days 3-4: Increase outdoor exposure to 3-4 hours, still in shade or filtered light.
Days 5-6: Allow 5-6 hours outdoors, gradually introducing more direct sunlight. Start with morning sun, which is gentler than afternoon sun.
Days 7-9: Extend time to 8 hours, increasing sunlight exposure. Start leaving them in their permanent location for short periods.
Days 10-12: Leave seedlings outdoors all day, bringing them in only at night.
Days 13-14: If weather permits, leave them outdoors overnight. They’re now ready for transplanting.
Throughout this process, monitor your seedlings closely. If you notice wilting or sunburned leaves, dial back the exposure. Keep the soil consistently moist during hardening off, as wind and sun can dry out small containers quickly.
For those using cold frames, you can harden off seedlings by opening the frame lid during the day and closing it at night, gradually increasing the amount of time it stays open.
Preparing Your Garden Bed for Transplanting
Your seedlings are only as strong as the soil they’re planted into. A well-prepared bed can mean the difference between thriving plants and ones that struggle all season.
Test and Amend Your Soil
This step is crucial and often overlooked. Conduct a soil test to understand pH levels and nutrient availability. Ideally, test in fall so you have time to amend before spring planting, but spring testing works too.
Work organic matter like compost into the top 6-8 inches of soil. This improves drainage in clay soils and water retention in sandy soils. If your soil is compacted, loosen it thoroughly. Compacted soil restricts root growth and makes it harder for water and air to penetrate.
Warm the Soil When Needed
For warm-season crops, soil temperature is critical. Research shows that plants like zinnias and celosia need soil temperatures of at least 60°F for active root growth. You can warm soil by covering beds with black plastic or landscape fabric for a couple of weeks before planting.
Set Up Irrigation
Having irrigation in place before transplanting makes life easier. Whether you use drip irrigation or hand watering, ensure you can provide consistent moisture immediately after planting and throughout the establishment period.
The Step-by-Step Transplanting Process
Now we get to the main event. Follow these steps carefully, and you’ll minimize transplant shock significantly.
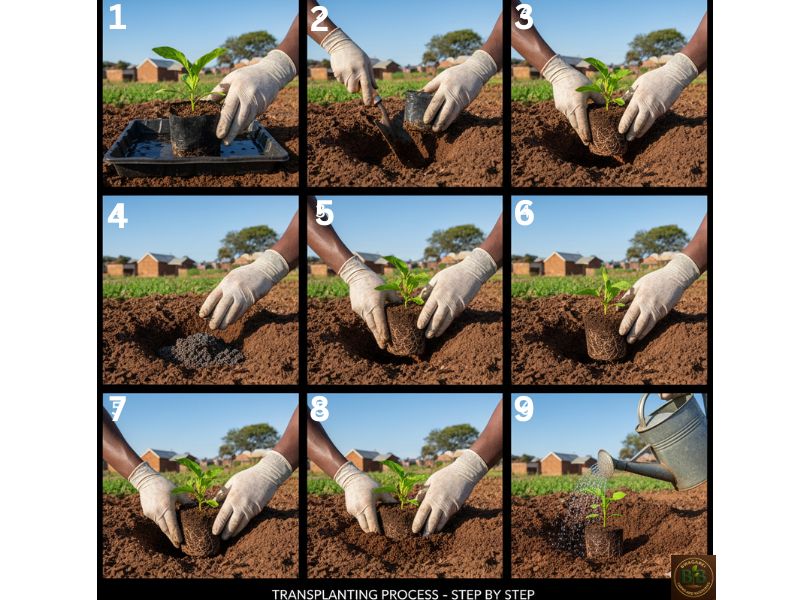
Step 1: Choose the Right Day and Time
Transplant on a calm, overcast day if possible. Cloudy conditions reduce stress on plants because they draw less moisture than sunny days. If you can’t get a cloudy day, transplant in early morning or late afternoon when temperatures are cooler and the sun is less intense.
Studies from commercial flower farms show that transplanting in early morning or late afternoon can reduce transplant shock by up to 30% compared to midday transplanting.
Step 2: Water Seedlings Thoroughly Before Moving
Water your seedlings thoroughly several hours before transplanting. This hydrates the plant and makes the root ball hold together better. Dry roots are extremely vulnerable to damage and take much longer to recover.
Step 3: Prepare the Planting Holes
Dig holes slightly larger than your seedling containers. The hole should be wide enough to accommodate the root ball comfortably and deep enough to plant at the same depth the seedling was growing, with a few exceptions.
Space holes according to each plant’s mature size requirements:
- Lettuce: 8-12 inches apart
- Tomatoes: 18-24 inches apart
- Peppers: 10-18 inches apart
- Cucumbers: 12-18 inches apart
- Herbs like basil: 12-16 inches apart
Step 4: Add Fertilizer to the Hole
Place a small amount of balanced fertilizer or compost in the bottom of each hole and work it into the soil. This gives your transplants an immediate nutrient boost. Phosphorus is particularly important at this stage because it promotes strong root development.
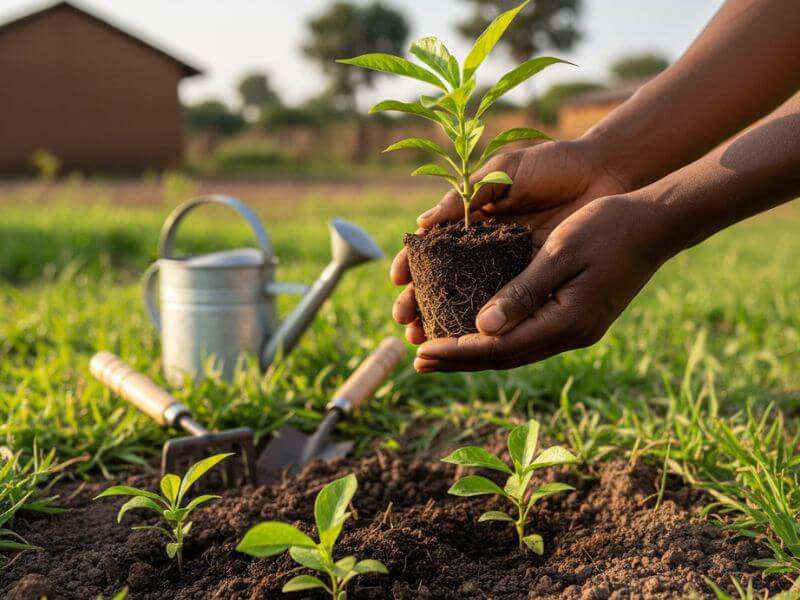
Step 5: Remove Seedlings Gently
This is where many gardeners cause unnecessary damage. Be extremely gentle with the roots. Push up from the bottom of the container to release the seedling, or squeeze flexible containers while supporting the stem between your fingers.
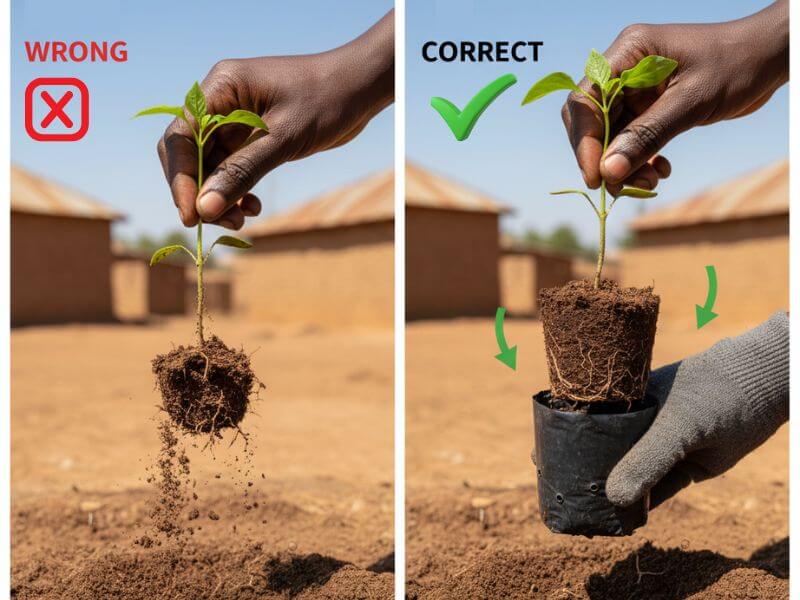
Never pull a seedling out by its stem. The stem is delicate and easily damaged. Instead, hold it by a leaf or support the root ball itself.
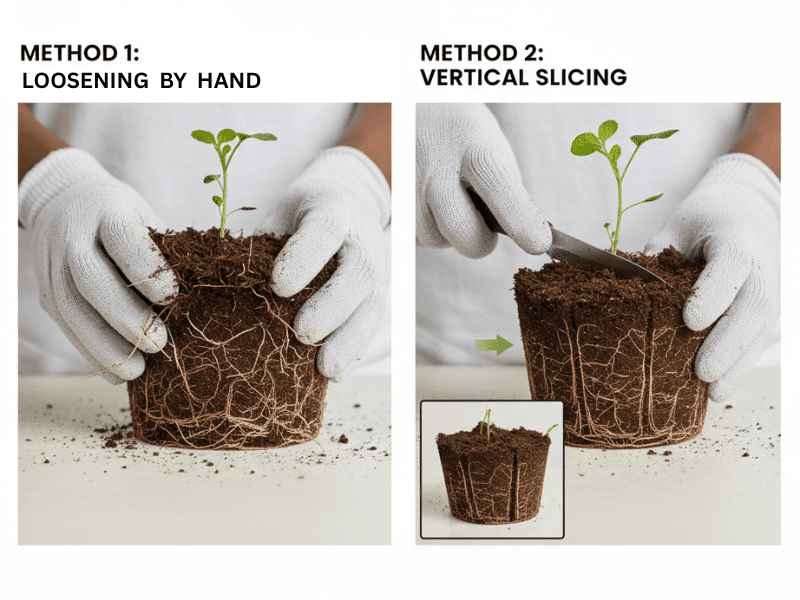
Step 6: Handle Root-Bound Seedlings Carefully
If roots are circling the container, gently tease them apart with your fingers. For severely root-bound plants, you can make a few vertical cuts in the root ball to encourage outward growth. While this seems counterintuitive, research shows that freeing circling roots leads to better long-term establishment.
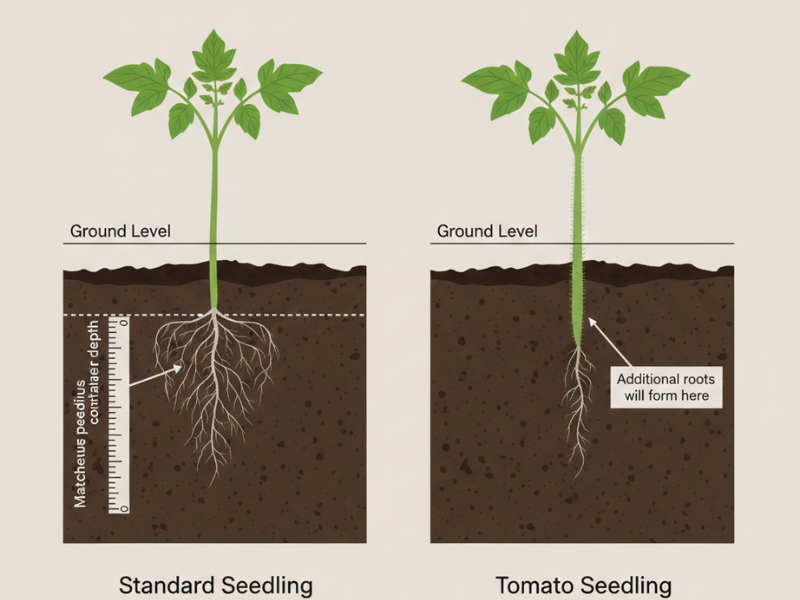
Step 7: Plant at the Proper Depth
Most seedlings should be planted at the same depth they were growing in their containers. The notable exception is tomatoes, which benefit from deeper planting. You can bury tomato stems up to the first set of true leaves because they’ll develop additional roots along the buried stem.
Step 8: Eliminate Air Pockets
After placing the seedling in the hole, fill around it with soil and gently firm it down. This isn’t about packing the soil hard, which can damage roots. You’re simply ensuring good root-to-soil contact and eliminating air pockets that can dry out roots.
Step 9: Water Immediately and Deeply
This step is non-negotiable. Immediately after planting, give each seedling a thorough watering. This settles the soil around roots, eliminates any remaining air pockets, and reduces transplant stress.
Use a watering can with a gentle spray or a hose on low pressure. You want to saturate the root zone without washing soil away from the stem.
Protecting Newly Transplanted Seedlings
Your work doesn’t end with planting. The first two weeks after transplanting are critical for establishing strong, healthy plants.
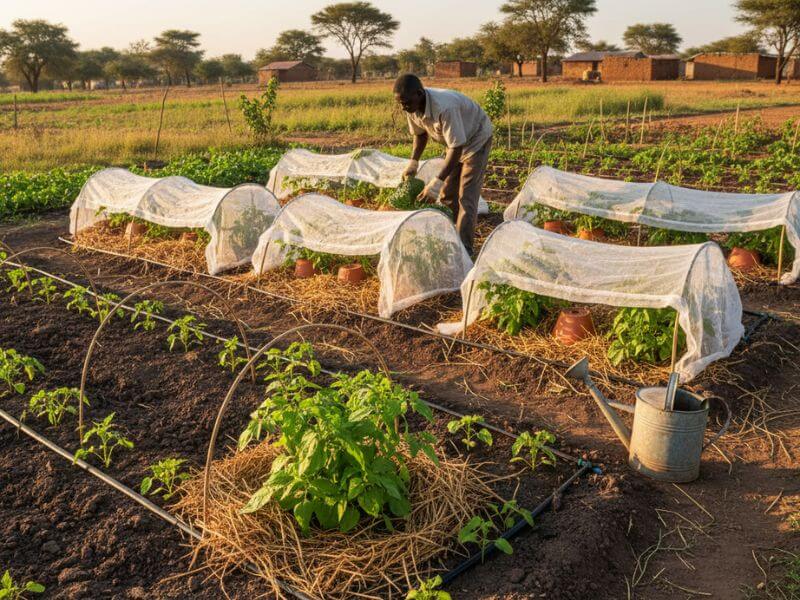
Provide Temporary Shade if Needed
Even hardened-off seedlings can benefit from temporary shade, especially if weather turns hot and sunny immediately after transplanting. Use row covers, shade cloth, or even temporary structures to filter harsh afternoon sun for the first few days.
Water Consistently
Keep the top few inches of soil consistently moist for the first week or two. This doesn’t mean waterlogged, but it does mean checking daily and watering when the top inch feels dry. Inconsistent watering during the establishment period is a major cause of transplant failure.
Research from commercial farms shows that hand-watering transplants for the first 1-2 weeks, even when drip irrigation is in place, significantly improves establishment rates.
Add Mulch After Plants Establish
Once seedlings show signs of active growth (typically after 5-7 days), apply a layer of organic mulch around plants. Mulch helps retain moisture, regulate soil temperature, and suppress weeds. Keep mulch a few inches away from stems to prevent rot.
Watch for Signs of Stress
Monitor your transplants daily. Slight wilting in the first day or two is normal, but plants should perk up overnight. If wilting persists beyond 2-3 days, or if leaves turn yellow or drop, investigate potential causes:
- Persistent wilting: Check soil moisture. It might be too dry or waterlogged
- Yellowing leaves: Could indicate nutrient deficiency or overwatering
- Slow growth: May signal root damage or soil problems
What About Transplanting Seedlings to Larger Pots?
Not every seedling goes straight from seed tray to garden. Sometimes you need to pot up seedlings to give them more room to grow before their final home.
When to Pot Up
Transplant seedlings to larger pots when:
- They’ve developed 1-2 sets of true leaves
- Roots are visible at drainage holes
- They’re becoming crowded in their current container
- Cotyledons are turning yellow
Choosing the Right Container Size
Select containers 2-3 times larger than the current one. Going too large can lead to overwatering issues because excess soil stays wet too long. A 3-4 inch pot is typically ideal for seedlings moving from cell packs.
The Potting Mix Matters
Use a quality potting mix, not garden soil. A good transplanting mix includes:
- 60% potting soil for structure
- 20% worm castings for immediate nutrients
- 20% perlite or vermiculite for drainage
Moisten the mix before using it. The soil should be damp but not soggy.
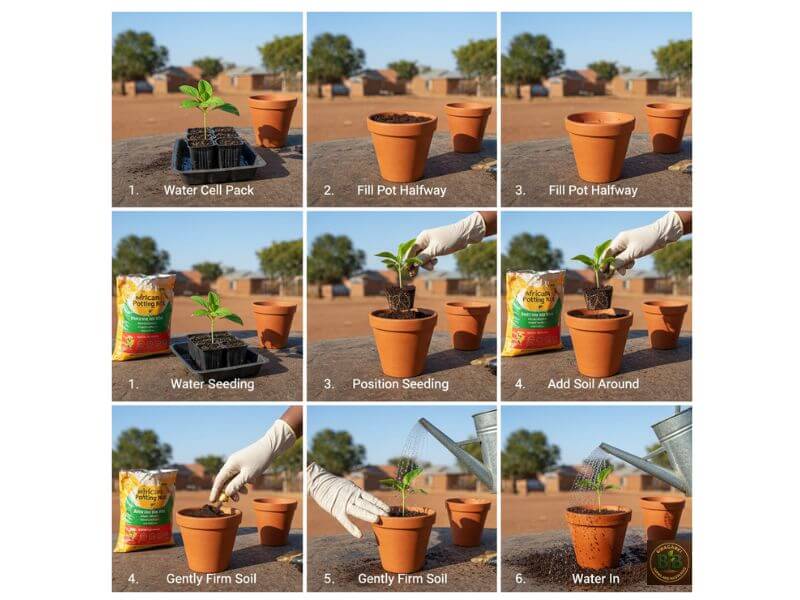
The Potting Up Process
Fill containers about halfway with soil mix. Remove seedlings gently, place them in the new pot, and fill around them with more soil. Firm gently and water thoroughly. The seedling should sit at the same depth as before, or slightly deeper if it’s leggy.
Plant Types
Not all seedlings are created equal. Some handle transplanting well, while others are notoriously sensitive.
Easy-to-Transplant Seedlings
These plants have resilient root systems and tolerate transplanting well:
- Tomatoes
- Peppers
- Lettuce
- Cabbage family (broccoli, kale, cabbage)
- Herbs like basil and parsley
Transplant-Sensitive Seedlings
These plants prefer minimal root disturbance:
- Root vegetables (carrots, parsnips)
- Cucumbers
- Squash
- Beans and peas
- Flowers like ammi and celosia
For sensitive plants, use biodegradable pots that can be planted directly in the ground, or start them in soil blocks to minimize root disturbance.
Common Transplanting Mistakes to Avoid
After years of experience and researching what works, here are the mistakes I see most often:
Skipping hardening off: This is the number one cause of transplant failure. Don’t skip this step, even if you’re in a hurry.
Transplanting at the wrong time: Moving seedlings too early or too late both cause problems. Watch for the right signs of readiness.
Rough handling of roots: Damage to the root system can set plants back by weeks or kill them entirely. Always be gentle.
Inconsistent watering: Letting transplants dry out or keeping them waterlogged both cause stress.
Ignoring weather conditions: Transplanting during heat waves, cold snaps, or windy days increases stress significantly.
Planting in unprepared soil: Poor soil is often the root cause of transplant failures that appear days or weeks after planting.
Not monitoring after planting: The first two weeks are critical. Pay attention and address problems quickly.
Troubleshooting Transplant Problems
Even with perfect technique, sometimes things go wrong. Here’s how to address common issues:
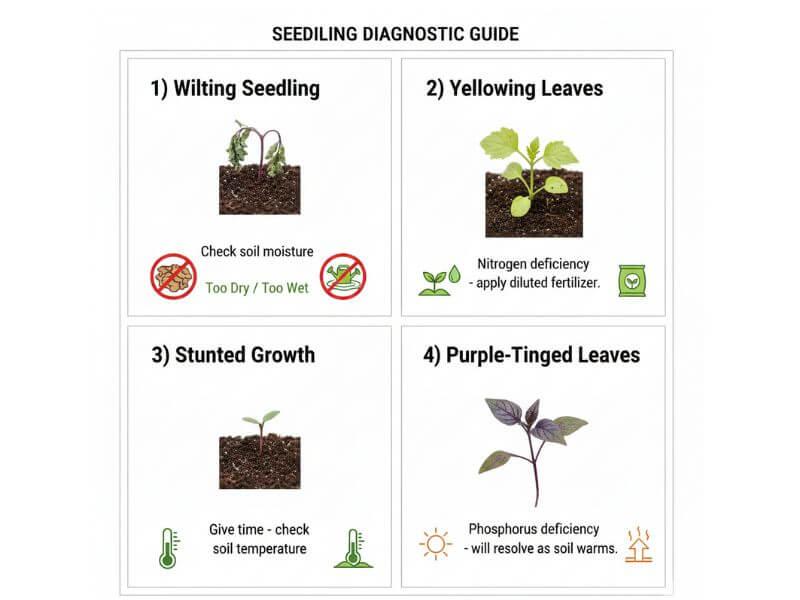
Wilting That Persists Beyond 24-48 Hours
Check soil moisture first. If it’s too dry, water deeply. If it’s waterlogged, improve drainage and hold off on watering. Consider adding temporary shade if the sun is intense.
Yellowing Leaves
This often indicates nitrogen deficiency or root damage. If soil is good and watering is consistent, apply a diluted liquid fertilizer. Some gardeners use a weak sugar water solution (1 tablespoon sugar per gallon of water) to help with transplant recovery, though results vary.
Stunted Growth
Give the plant time. Some plants just need a few extra days to recover. If stunted growth persists beyond two weeks, test your soil and consider whether root damage was more severe than you thought.
Purple-Tinged Leaves
This often signals phosphorus deficiency, which can happen when cool soil temperatures prevent nutrient uptake. As soil warms and roots establish, this typically resolves itself.
The Science Behind Successful Transplanting
Understanding why these techniques work helps you apply them better. When you transplant, you’re inevitably damaging some of the fine root hairs that absorb water and nutrients. These microscopic roots are incredibly fragile, and any disturbance sets them back.
The plant must then allocate resources to rebuilding its root system before it can focus on growing above ground. This is why you often see a pause in visible growth immediately after transplanting, even when everything goes smoothly.
Studies on seedling transplanting show that plants experiencing minimal root disturbance and gradual environmental adaptation can maintain growth rates of 87% or higher compared to non-transplanted seedlings. This demonstrates that proper technique really does make a measurable difference.
The hardening off process works by triggering physiological changes. Outdoor conditions stimulate plants to produce protective compounds, thicken cell walls, and develop better water-conservation mechanisms. Without this adaptation period, plants lack these defenses and struggle with the sudden environmental change.
Creating Your Transplanting Success Checklist
Here’s a practical checklist you can follow every time you transplant seedlings:
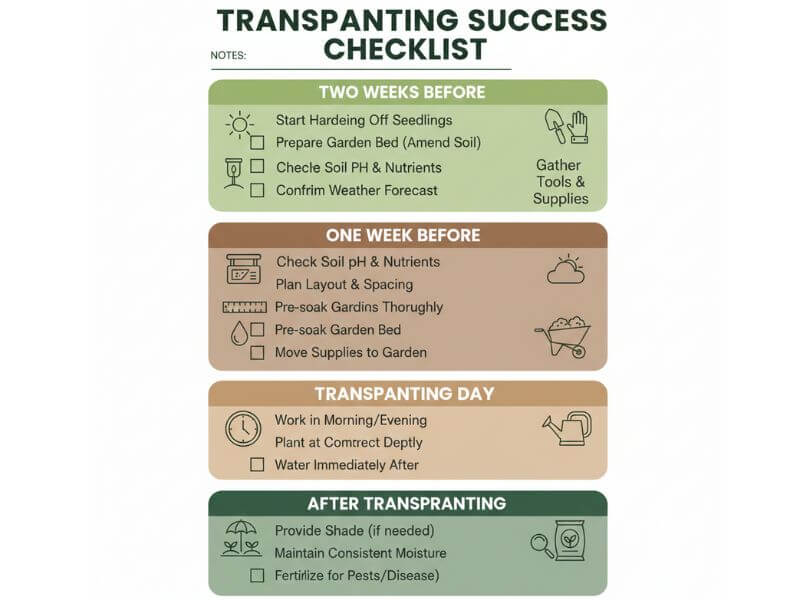
Two weeks before transplanting:
- Begin hardening off process
- Test and prepare garden soil
- Set up irrigation if needed
One week before:
- Continue hardening off
- Plan spacing and layout
- Check weather forecast
Day before transplanting:
- Water seedlings thoroughly
- Prepare planting holes
- Add amendments to holes
- Gather supplies (stakes, labels, watering can)
Transplanting day:
- Choose morning or late afternoon
- Check for clouds or mild conditions
- Remove seedlings gently
- Plant at proper depth
- Water immediately and deeply
After transplanting:
- Monitor daily for stress signs
- Water consistently
- Provide temporary shade if needed
- Add mulch after 5-7 days
- Be patient and watch for growth
Your Next Steps to Transplanting Success
Transplanting seedlings without shock isn’t complicated, but it does require attention to detail and patience. The difference between seedlings that thrive and those that struggle often comes down to these simple techniques applied consistently.
Start by choosing the right time to transplant based on true leaf development and root readiness. Never skip the hardening off process – those 7-14 days of gradual exposure are your insurance policy against transplant shock. Prepare your soil properly, handle roots gently, and provide consistent care during the critical first two weeks.
Remember those statistics I mentioned earlier? Commercial growers achieving 94% success rates and research showing 87% growth maintenance when transplanting is done correctly? Those numbers prove that this isn’t guesswork. These techniques work because they’re based on understanding plant biology and meeting plants’ real needs.
Your seedlings represent weeks of care and anticipation. Give them the best possible start in their new home by following these proven methods. With practice, you’ll develop an intuition for what your plants need, and transplanting will become second nature.
Ready to put this knowledge into action? Look at your seedlings right now. Do they have true leaves? Are roots showing at drainage holes? If so, start the hardening off process today. In two weeks, you’ll be transplanting with confidence, knowing you’re giving your plants every advantage for success.
Your garden is waiting, and your seedlings are ready to thrive. Let’s make this growing season your best one yet.